When you have your management server to RDP into to manage your environment it is a good time to create some objects in your active directory, and it makes sense to start with the basic structure of Organizational Units (OUs).
You need to define the name of the OU and the Distinuguished Name of the domain and pass these in as variables and it would be useful if we checked if the OU already exists so that we can reduce errors we would get if the script was re-run with the same OUname passed to it:-
param([string]$ouname,$DomainDN)
$LDAPPATH = "LDAP://"+ $DomainDN
$search = [System.DirectoryServices.DirectorySearcher]$LDAPPATH
$search.Filter = "(&(name=$ouname)(objectCategory=organizationalunit))"
$result = $search.FindOne()
Next you need to check that the script didn't find an OU with that name then to create the OU, however if the OU already exists, simply record this in the install log:-
if ($result -eq $null) {
$date = get-date -uformat %d/%m/%y" "%H:%M:%S
$date + " Creating OU: " + $ouname>>C:\Install\Logs\ModularADInstall.log
$LDAPCONN = [adsi] $LDAPPATH$newou = $LDAPCONN.Create("OrganizationalUnit",$ouname) $newou.Put("description","AD Auto Deploy")$newou.SetInfo();
$date = get-date -uformat %d/%m/%y" "%H:%M:%S
$date + " Created OU: " + $ou>>C:\Install\Logs\ModularADInstall.log}
else{
$date = get-date -uformat %d/%m/%y" "%H:%M:%S
$date + " OU already exists : " + $ouname>>C:\Install\Logs\ModularADInstall.log}
Monday, August 18, 2008
Powershell - Simple Logging
A very simple yet useful way of dumping messages to a log file during the running of your powershell scripts is by using the following code snippet:-
$date = get-date -uformat %d/%m/%y" "%H:%M:%S
$date + " Creating OU: " + $ouname>>C:\Install\Logs\ModularADInstall.log
This code will basically log a message to file that begins with the date and time and then "Creating OU: followed by the vaule of the variable $ouname, the line in the log file could look something like this:-
18/08/08 13:15:40 Creating OU: OU1
If you want to change the date format then you can change this on the first line.
Adding a Machine to the Domain with powershell
The thing you might want to do just after you have setup your first domain controller and raised the functional levels of the domain and forest is create a management server that you will install all the tools required to administer the other servers (including the Domain Controllers) so that admins will not have to RDP directly to those servers.
There is a pretty simple script you can run on this management server to add it to the domain and it uses WMI to set this information on the machine, you can either hardcode the domain name, deployment username and password into the code or the best thing to do is pass them into the script as parameters:-
param([string]$DNSDomName,$pw,$DeployAcct)
$domainName=$DNSDomName
$domainPw=$pw
$domainAcc=$DNSDomName + "\" + $DeployAcct
$comp = get-wmiobject Win32_ComputerSystem
$comp.JoinDomainOrWorkGroup($domainName,$domainPw,$domainAcc,$null,3)
If you checked the domain the machine is a member of using system information at this point it would show the machine is a member of the domain, however you need to reboot the machine to complete the process.
Raising Active Directory Functional Levels with Powershell
It has been a while since I updated this blog but I have had a number of posts about using Powershell to automate Active Directory builds and this is a good a place as any.
So you have your first Domain Controller up and running after the post DCpromo reboot and you need to raise the functional level of the Domain and the forest to get the extra functionality that this give you.
The first job is to raise the domain functional level of this first domain, as the support for Active Directory built into Powershell is limited we use .Net framework:-
$Forest = [System.DirectoryServices.ActiveDirectory.Forest]::getcurrentforest()
Here we can retrieve the domains in the current forest:-
$domains=$forest.domains
Next we go through each existing domain in turn and check the functional level, if you have just built the first domain you should only have one domain, and it should initially be set to Windows 2000 mixed, in order to raise this using Powershell you need to raise it to Windows 2000 native, then up to Windows 2003 functional level:-
foreach ($domain in $domains) {if ($domain.DomainMode -ne "Windows2003Domain") { $domain.RaiseDomainFunctionality('Windows2000NativeDomain') $domain.RaiseDomainFunctionality('Windows2003Domain') }}
So the script in full is:-
$Forest = [System.DirectoryServices.ActiveDirectory.Forest]::getcurrentforest()
$domains=$forest.domains
foreach ($domain in $domains) {if ($domain.DomainMode -ne "Windows2003Domain") { $domain.RaiseDomainFunctionality('Windows2000NativeDomain') $domain.RaiseDomainFunctionality('Windows2003Domain') }}
This just raises the domain functional level, but to raise the forest functional level I tried putting it in the same script, and telling the script to sleep for some time before raising the forest functional level, in the end I just used a separate script that looks fairly similar:-
$forest = [System.DirectoryServices.ActiveDirectory.Forest]::getcurrentforest()
if ($forest.forestMode -ne "Windows2003Forest") {$forest.RaiseForestFunctionality("Windows2003Forest")}
Tuesday, March 18, 2008
Group Policy Objects and Powershell - 3 Linking the GPOs
I had thought about detailing how you can populate GPOs from backup using powershell, however this has already been covered more than adequately elsewhere, however the script I use looks into the backup location, uses a migration table (to make these GPOs easily pushed into multiple environments), and takes all the GPOs it finds, looks for the GPOs in the Active Directory, then populates them.
Linking them is slightly different, first we pass some variables into the script by using arguments when running the script, it then searches for the GPO in the AD by display name, searches for an the defined OU, then writes the link by writinging the AD attribute 'gpLink' on the OU.
param([string]$domainName,$domainDN,$gpoName,$OU)
# Searches for GPO defined above
$gpm = New-Object -ComObject GPMgmt.GPM # Create the GPMC Main object
$gpmConstants = $gpm.GetConstants() # Load the GPMC constants
$gpmDomain = $gpm.GetDomain($domainName, "", $gpmConstants.UseAnyDC) # Connect to the domain passed using any DC
$gpmSearchCriteria = $gpm.CreateSearchCriteria()
$gpmSearchCriteria.Add($gpmConstants.SearchPropertyGPODisplayName, $gpmConstants.SearchOpEquals, $gpoName)
$gpmResultlist = $gpmDomain.SearchGPOs($gpmSearchCriteria) # This will return the GPOs found
foreach ($gpmResult in $gpmResultList)
{
# Finds the OU defined above
$domainpath = "LDAP://" + $domainDN
$domain = [adsi] $domainpath
$searcher = New-Object System.DirectoryServices.DirectorySearcher $domain
$searcher.Filter = $searcher.Filter ='(&(objectClass=OrganizationalUnit)(name=' + $OU + '))'
$OUResult = $searcher.FindAll()
foreach ($result in $OUResult) {$Ou=$result.Path.ToString()}
$gpLinkEntry = "[LDAP://" + $gpmResult.Path + ";0]"
$OUC=new-object directoryservices.directoryentry($OU) #connect to OU
$OUC.Put("gplink", $gpLinkEntry) #Sets GPLink.
$OUC.SetInfo()
}
Group Policy Objects and Powershell - 4 Linking the GPOs - Part 2
In the previous post the method of linking GPOs works reasonably well, however, what if you are linking to an OU that already has a link defined, or you want to link multiple GPOs in a specific order, and you might not want to script them in one at a time, maybe you would want to use a csv file to act as an input file.
First of all you need to pass location of the csv, and the domain name as an argument:-
Param ([string]$File,$domainName)
And as we are going to loop through sections of the script, to help with readability of the script I am going to make use of functions to divide up the workload in the script, fist of all defining a function that looks for the GPO in the AD, and then creates the link by defining a scope of Management rather than writing the gplink attribute into the AD. This allows you to define a link order.
#Function to Create the GPOLink
function CreateGPOLink ($LinkDN,$GPOname,$LinkOrder)
{
$root=[adsi] ""
$gpm = New-Object -ComObject GPMgmt.GPM # Create the GPMC Main object
$gpmConstants = $gpm.GetConstants() # Load the GPMC constants
$gpmDomain = $gpm.GetDomain($domainName, "", $gpmConstants.UseAnyDC)
# Create the GPO Searcher
$searcher = $gpm.CreateSearchCriteria()
$searcher.Add( $gpm.GetConstants().SearchPropertyGPODisplayName, `
$gpm.GetConstants().SearchOpEquals, $GPOname )
$GPOlist = $gpmDomain.SearchGPOs( $searcher )
#Define the GPO Scope Of Management
$LinkDN
$gpmSOM = $gpmDomain.GetSOM($LinkDN)
# Create the actual link
$GPMlink = $gpmSOM.CreateGPOLink($LinkOrder, $GPOlist.Item(1) )}
The next function needs to be a function that imports the csv file, and reads it line by line, calls the CreateGpoLink function by passing it variables from the csv file where the variable 'type' from the csv is equal to GPOLink, the other variables are LinkDN, GPOname, and LinkOrder – I will show you the format of the csv at the end.
function Import-GPOLinks([string]$File)
{
Import-Csv $File foreach-object { if ($_.type -eq "GPOLINK") {CreateGPOLink $_.LinkDN $_.GPOname $_.LinkOrder}}
}
Finally we need to call the Import-GPOLinks function and passing it the csvfile location from the arguments passed with the script.
Import-GPOLinks $File
The CSV in this case will need to look something like this:-
type,LinkDN,GPOname,LinkOrder
GPOLink,"ou=Architecture,dc=philtest,dc=pri",DenyUserRightsPolicy_C1.0,1
GPOLink,"ou=Architecture,dc=philtest,dc=pri",AllowUserRightsPolicy_C1.0,2
GPOLink,"ou=Architecture,dc=philtest,dc=pri",AllMembersRestrictedGroupsPolicy_C1.0,3
GPOLink,"ou=Architecture,dc=philtest,dc=pri",MemberServerBaselinePolicy_C1.0,4
GPOLink,"ou=Architecture,dc=philtest,dc=pri",LogonBannerPolicy_C1.0,5
GPOLink,"ou=Architecture,dc=philtest,dc=pri",TerminalServicesPolicy_C1.0,6
GPOLink,"ou=Domain Controllers,dc=philtest,dc=pri",DomainControllerPolicy_C1.0,1
GPOLink,"dc=philtest,dc=pri",DomainPolicy_CU1.0,1
As you can see from the final entry this allows me to link to the route of the domain as easily as I can to a specific GPO. You might wonder why I bothered to define a 'type' entry in the csv, this is because in my case I use another version of the script I used in the GPO creation post, and I use the same CSV file with a different 'type' entry of 'GPO' so that the script can pick out the relevant entries, this new version looks like this using much the same method as above:-
Param ([string]$File,$domainName)
function creategpo($gponame)
{
$gpm = New-Object -ComObject GPMgmt.GPM # Create the GPMC Main object
$gpmConstants = $gpm.GetConstants()
$gpmDomain = $gpm.GetDomain($domainName, "", $gpmConstants.UseAnyDC) # Connect to the domain passed using any DC
$gpmGpo = $gpmDomain.CreateGPO()
$gpmGpo.DisplayName = $gponame
}
function Import-GPOList([string]$File)
{
Import-Csv $File foreach-object { if ($_.type -eq "GPO") {creategpo $_.GPOname}}
}
Import-GPOList $File
Tuesday, February 12, 2008
Group Policy Objects and Powershell - 2 Creating the GPOs
As was quickly pointed out to me SDM Software has some excellent freeware Cmdlets available, and if you don't know this is Darren Mar-Elia's – The GPO Guy's company and so they are no doubt well written and will do the job for you. Having said that, it wasn't an option for me as the Company I work for would never have accepted me using them, and I would have felt bad using someone else's work in large AD implementations. More importantly this gave me a chance at playing around with Powershell, and achieve something useful with it. So I would say if Darren's cmdlets do the job for you and you are happy using them, then make use of them, if not then read on.
After you look at the completed scripts if you are familiar with the wsf scripts you get with GPMC then you will begin to see the similarities and it will make it easier to come up with your own Powershell scripts.
As previously mentioned the Technet article - Simplify Group Policy Administration with Windows PowerShell
is a good introduction and explains that the wsf GPMC scripts actually call the GPMgmt.GPM COM object, and as COM objects can be called directly from Powershell we can work with this to do most of, if not all we need to do with Group Policy objects (with the exception of amending contents of the GPO itself).
So the first thing we need to do in this script is to define the domain we are going to work with and the name of the GPO we want to create, then instantiate the COM object, Connect to the Domain, then create the GPO with the Display name you defined earlier.
$domainName="Philtest.PRI"
$gpmName="GPO 1"
$gpm = New-Object -ComObject GPMgmt.GPM
$gpmConstants = $gpm.GetConstants()
$gpmDomain = $gpm.GetDomain("$domainName", "", $gpmConstants.UseAnyDC)
$gpmGpo = $gpmDomain.CreateGPO()
$gpmGpo.DisplayName = "$gpmName"
So this is a useful way of starting the script, but what if you want to create a number of GPOs defined in a text file? Actually it is pretty straight forward you can create a text file that lists the GPOs on separate lines:-
GPO 1
GPO 2
GPO 3
GPO4
So from here you need to add some elements to the script to connect to this text file and retrieve the GPO names:-
$aryText = Get-Content -Path "c:\PSScripts\GPOs.txt"
forEach ($aryElement in $aryText)
{
$gpm = New-Object -ComObject GPMgmt.GPM
$gpmConstants = $gpm.GetConstants()
$gpmDomain = $gpm.GetDomain("$domainName", "", $gpmConstants.UseAnyDC)
$gpmGpo = $gpmDomain.CreateGPO()
$gpmGpo.DisplayName = $aryElement
}
This script gets the contents of the text file and scrolls through it creating GPOs with the Displaynames of Whatever is on each line of the text file(in the case GPO 1, GPO 2, GPO 3, GPO 4)
Monday, February 11, 2008
Group Policy Objects and Powershell - 1 Introduction
I haven't posted anything in a long time, mainly due to work pressures and not having too much to say. I have started a few posts then not got around to finishing them, however some work I have been doing recently has prompted this post as I figured this could be useful for some people.
Anyway from my earlier posts you probably won't realise that I actually specialise in Active Directory, and more specifically in design. So when building test networks for various clients I did have a long commissioning document that I run through un-disturbed in about 5 or 6 hours for a 2 domain model (2 Domain Controller in each) with basic Certificate services installed and configured. However what if you wanted to automate this, on one large project that is what our build team did - fully automated AD build using VB Scripts and ADS (Automated Deployment Services). This allows for someone less knowledgable to install the AD, but more importantly it allows for consistency in the deployments with much of the possible human error removed. This scripts are all well and good, however they are not supportable due to a lack of documentation and lack of commenting in the scripts, and the ownership of the automated build process has shifted to the team I work in so we decided to rewrite it all - in Powershell.
I had played around with powershell in its earlier guise as MONAD, but not really in anger and was interested in learning about it. At this point we had decided to modularise our standard AD design into a base build and a number of extra AD modules that could be implemented depending on what was to be installed into the environment (Exchange, OCS, Sharepoint, etc).
The base build would initially contain a number of things that it would be useful to use powershell to build, the two I was concentrating on initially were GPOs and DCPromo answer file creation (from a config file).
I will concentrate on the GPO problem here though as it was the most interesting, googling for GPO management with Powershell (or similar) does not retrieve a lot of terribly useful stuff but it does return a number of useful starting points th emost useful of which initially I found to be this article from Technet Magazine (extra useful as you can download a file with the script source) - Simplify Group Policy Administration with Windows PowerShell
The main problem I saw straight away was that there are no cmdlets built into powershell to manage GPOs so I had two main options:-
I am not a programmer so realistically that left me with second option, so I got stuck into the examples provided in the technet article however they didn't cover all of what I needed to do which was the following:-
Anyway from my earlier posts you probably won't realise that I actually specialise in Active Directory, and more specifically in design. So when building test networks for various clients I did have a long commissioning document that I run through un-disturbed in about 5 or 6 hours for a 2 domain model (2 Domain Controller in each) with basic Certificate services installed and configured. However what if you wanted to automate this, on one large project that is what our build team did - fully automated AD build using VB Scripts and ADS (Automated Deployment Services). This allows for someone less knowledgable to install the AD, but more importantly it allows for consistency in the deployments with much of the possible human error removed. This scripts are all well and good, however they are not supportable due to a lack of documentation and lack of commenting in the scripts, and the ownership of the automated build process has shifted to the team I work in so we decided to rewrite it all - in Powershell.
I had played around with powershell in its earlier guise as MONAD, but not really in anger and was interested in learning about it. At this point we had decided to modularise our standard AD design into a base build and a number of extra AD modules that could be implemented depending on what was to be installed into the environment (Exchange, OCS, Sharepoint, etc).
The base build would initially contain a number of things that it would be useful to use powershell to build, the two I was concentrating on initially were GPOs and DCPromo answer file creation (from a config file).
I will concentrate on the GPO problem here though as it was the most interesting, googling for GPO management with Powershell (or similar) does not retrieve a lot of terribly useful stuff but it does return a number of useful starting points th emost useful of which initially I found to be this article from Technet Magazine (extra useful as you can download a file with the script source) - Simplify Group Policy Administration with Windows PowerShell
The main problem I saw straight away was that there are no cmdlets built into powershell to manage GPOs so I had two main options:-
- Creating my own in C#
- Interacting with the COM objects used in the scripts you get with the Group Policy Management Console (GPMC) directly from Powershell.
I am not a programmer so realistically that left me with second option, so I got stuck into the examples provided in the technet article however they didn't cover all of what I needed to do which was the following:-
- Create a number of GPOs
- Import GPOs from a backup taking from a different domain
- Link the GPOs to the relevant OUs
Over the course of the next few posts I will go through how you do this, then from there go into how to pass arguments into the scripts from text files or XML files.
Friday, May 04, 2007
Vista Activation
Well after my AMD 64X2 CPU, ATI Graphics, NVidia chipset issues with Vista I was glad I hadn't entered the License key into setup when installing Vista. If you didn't already know you don't actually have to put the license key in at install, this puts Vista into a 30 day trial mode which is useful to do in case you get unexpected issues such as I did, this avoids having to go through the issues surrounding moving your Vista installation over to a new machine in case of issues.
Originally I had bought a few new parts to build the Vista PC I was going to install the Ultimate 64 bit edition on, so I ordered the OEM copy of Vista. This has its advantages, it is cheaper; and its disadvantages, the installation is then tied to the Motherboard.
Originally I had bought a few new parts to build the Vista PC I was going to install the Ultimate 64 bit edition on, so I ordered the OEM copy of Vista. This has its advantages, it is cheaper; and its disadvantages, the installation is then tied to the Motherboard.
So what if you have done exactly as I did and you wanted to move the installation over to a new machine and sell the old components on ebay, but didn't quite have the cash and needed another month in the trial mode to get the cash together? Well, there is an answer. During testing last year the team I was in came across the commandline version of the Software Licensing Manager in Vista, this allows you to Manage the product activation, change the License Key you are using, and even to re-arm the trial period (for 4 times only).
To access this commandline utility (if it is not as in my case on the start menu), you need to Click on the start Orb - Accessories, then right click on Command Prompt and select Run as Administrator:-
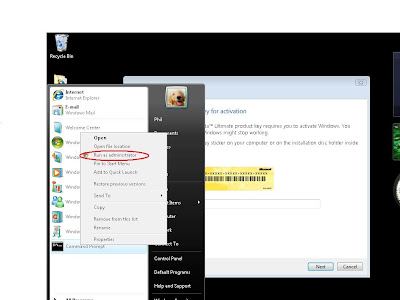
Select this option, and either accept the UAC prompt (if running as an administrator level account), or enter the credentials of an administrator account.
In the command prompt enter slmgr /? this will bring up a wscript switch option box up

Here you can see all the switches you can use with the software Licensing Manager, the one we are interested in is rearm. So click on OK, then in the command propmpt enter slmgr -rearm
then click enter. A prompt will appear saying that the command completed successfully, click OK and restart your system. This will rearm the trial period for you to continue working for a further 30 until you can buy the new parts you need.
Thursday, April 05, 2007
64 Bit Woes...........
Well after a hiatus of a few months where I have been a bit busy with work unrelated to Vista of anything similar I have finally bitten the bullet and bought a shiny copy of Vista Ultimate 64Bit Version, yes the 64 Bit Version! I had heard all the issues with Drivers with the 64 Bit version but after checking up on the motherboard I was going to buy and the graphics card I had I was confident all would be fine.
How wrong I was, the system I had been using on 32 Bit vista was fine, but the processor wasn’t great, memory upgradability wasn’t great, and I hadn’t had my AGP based graphics card for long. So I picked a motherboard that supported a lot of RAM and AGP, and it turned out to be an AMD based board, but luckily I could get an Athlon 64x2 (AM2) processor to go with the motherboard so all should have been fine. Vista installed, no problems reported with the hardware apart from the AGP based card, I had the 64 Bit Vista drivers downloaded already, everything installed nicely, rebooted as prompted, and then the drivers failed. The AGP card was back in PCI mode. So after trying to install other versions of the drivers and ripping them out completely a lot of research uncovered that I could disable one of the cores in the dual core processor and everything would work perfectly, I did this using MSCONFIG, then let windows install the Microsoft version of the drivers. After a reboot everything was fine, and now that it is I will be imaging the machine, and quickly. Interestingly enough the small amount of software I have put on there works perfectly, and fast (although I only have a proxy server and SSH server installed so far). Next comes all the stuff I had the 32 Bit version set up to do such as serving content to my XBOX 360 via the media center, but there will be more about that in my non-work blog which is quite sparse at the moment.
How wrong I was, the system I had been using on 32 Bit vista was fine, but the processor wasn’t great, memory upgradability wasn’t great, and I hadn’t had my AGP based graphics card for long. So I picked a motherboard that supported a lot of RAM and AGP, and it turned out to be an AMD based board, but luckily I could get an Athlon 64x2 (AM2) processor to go with the motherboard so all should have been fine. Vista installed, no problems reported with the hardware apart from the AGP based card, I had the 64 Bit Vista drivers downloaded already, everything installed nicely, rebooted as prompted, and then the drivers failed. The AGP card was back in PCI mode. So after trying to install other versions of the drivers and ripping them out completely a lot of research uncovered that I could disable one of the cores in the dual core processor and everything would work perfectly, I did this using MSCONFIG, then let windows install the Microsoft version of the drivers. After a reboot everything was fine, and now that it is I will be imaging the machine, and quickly. Interestingly enough the small amount of software I have put on there works perfectly, and fast (although I only have a proxy server and SSH server installed so far). Next comes all the stuff I had the 32 Bit version set up to do such as serving content to my XBOX 360 via the media center, but there will be more about that in my non-work blog which is quite sparse at the moment.
Friday, December 08, 2006
ADM to ADMX Conversion
In previous posts I have gone through the process of converting admx templates that ship with Vista to the old style adm templates. Thankfully the process of converting your custom adm templates to admx templates is a lot easier thanks to a tool by FullArmour that has been licensed by Microsoft, ADMX Migrator. It is available for download at http://go.microsoft.com/fwlink/?LinkId=77409 and requires MMCC 3.0 and .NET 2.0 to be installed prior to installation.
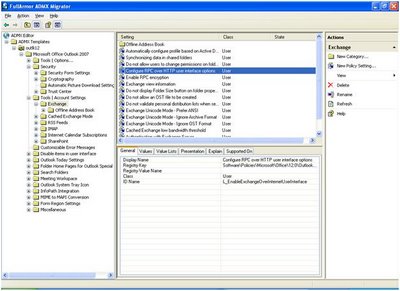
It comes in two flavours, UI and command line, first we will use the UI to convert a standard adm template to an ADMX template. Launch the ADMX editor and you get the following:-

If you click on the ‘Generate ADMX from ADM…’ option in the right hand pane then navigate to the adm you want to convert, admx migrator then creates a temporary admx template then you click ‘yes’ to load this temporary admx template into console. When it has loaded into the console you can navigate the admx template in much the same way as in the GPMC in Vista:-
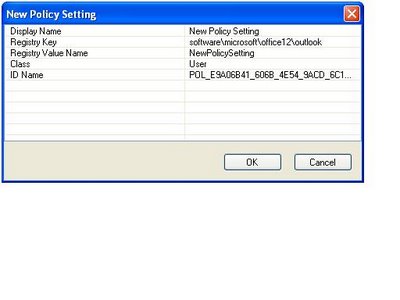
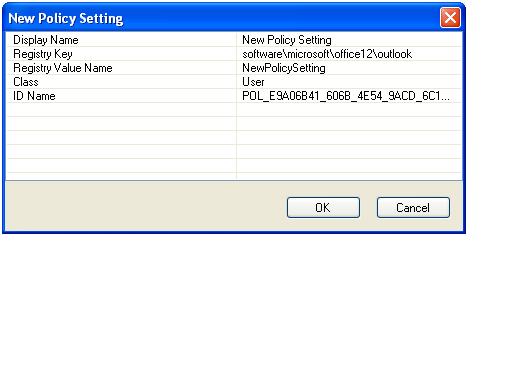
From here you will notice that in the right hand pane you can create new categories or policy settings:-
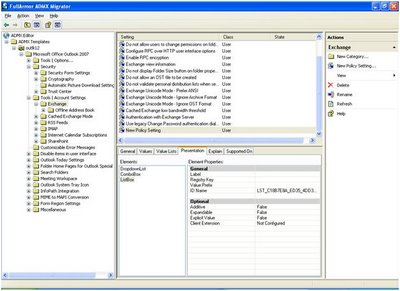
Once you have created the new setting you can control how the setting is displayed in GPMC and any elements such as listboxes, combo boxes, drop down lists as shown here:-
After you have amended the admx template you can save the completed template, so the tool makes it easy to convert old adm templates, create new admx templates, and amend them as you require, certainly easier than typing the admx by hand and looks tidier in the new gpmc than importing the legacy adm templates.
It comes in two flavours, UI and command line, first we will use the UI to convert a standard adm template to an ADMX template. Launch the ADMX editor and you get the following:-
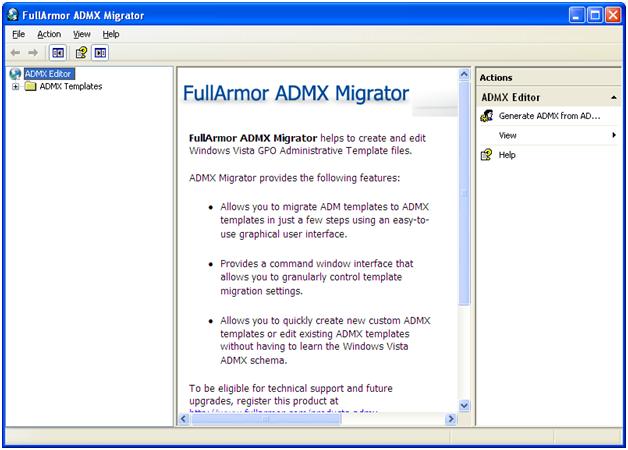
If you click on the ‘Generate ADMX from ADM…’ option in the right hand pane then navigate to the adm you want to convert, admx migrator then creates a temporary admx template then you click ‘yes’ to load this temporary admx template into console. When it has loaded into the console you can navigate the admx template in much the same way as in the GPMC in Vista:-
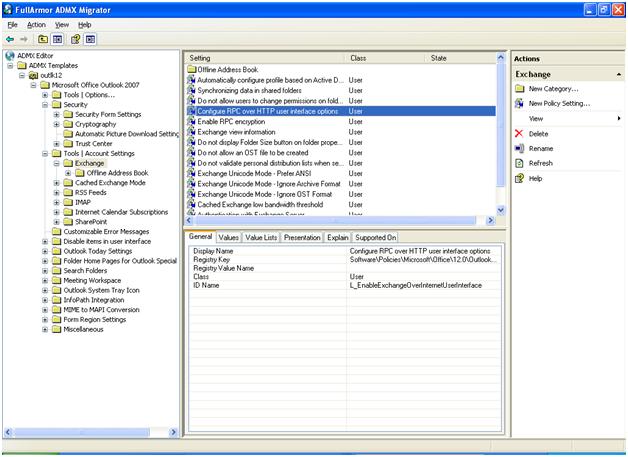
From here you will notice that in the right hand pane you can create new categories or policy settings:-
Once you have created the new setting you can control how the setting is displayed in GPMC and any elements such as listboxes, combo boxes, drop down lists as shown here:-

After you have amended the admx template you can save the completed template, so the tool makes it easy to convert old adm templates, create new admx templates, and amend them as you require, certainly easier than typing the admx by hand and looks tidier in the new gpmc than importing the legacy adm templates.
Subscribe to:
Posts (Atom)

