Friday, December 08, 2006

ADM to ADMX Conversion

In previous posts I have gone through the process of converting admx templates that ship with Vista to the old style adm templates. Thankfully the process of converting your custom adm templates to admx templates is a lot easier thanks to a tool by FullArmour that has been licensed by Microsoft, ADMX Migrator. It is available for download at http://go.microsoft.com/fwlink/?LinkId=77409 and requires MMCC 3.0 and .NET 2.0 to be installed prior to installation.

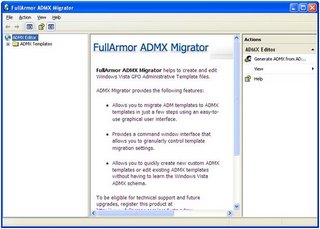
It comes in two flavours, UI and command line, first we will use the UI to convert a standard adm template to an ADMX template. Launch the ADMX editor and you get the following:-


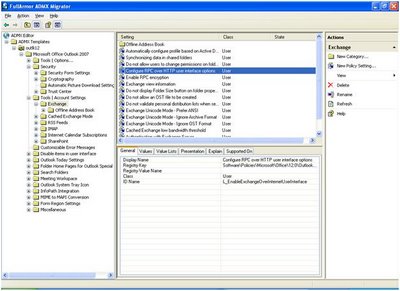
If you click on the ‘Generate ADMX from ADM…’ option in the right hand pane then navigate to the adm you want to convert, admx migrator then creates a temporary admx template then you click ‘yes’ to load this temporary admx template into console. When it has loaded into the console you can navigate the admx template in much the same way as in the GPMC in Vista:-


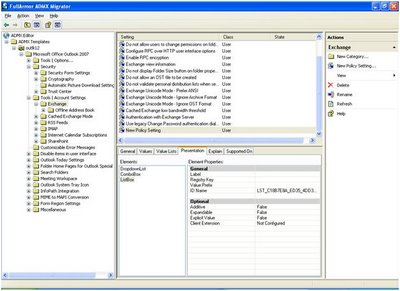
From here you will notice that in the right hand pane you can create new categories or policy settings:-


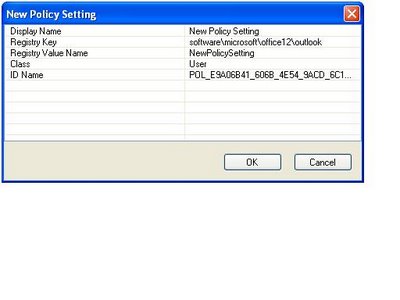
Once you have created the new setting you can control how the setting is displayed in GPMC and any elements such as listboxes, combo boxes, drop down lists as shown here:-


After you have amended the admx template you can save the completed template, so the tool makes it easy to convert old adm templates, create new admx templates, and amend them as you require, certainly easier than typing the admx by hand and looks tidier in the new gpmc than importing the legacy adm templates.

Tuesday, November 28, 2006

Office 2007 Blogging Tools

Well I have been otherwise engaged for the past few months, and so I haven't had anything remotely useful to blog about, but I have made the plunge and installed Office 2007 which includes a couple of useful new features related to blogs.

In Word 2007, when you choose to create a new document, it gives you the option of creating a new Blog post.


The first time you do this it requests that you enter the details of your blog provider, it has a dropdown list of popular provider's and as I use Blogspot I figured I was out of luck. So I clicked on the link that my blog provider isn't listed, I was taken to this page, which has a useful description of how to do all this stuff in word. Well it helpfully pointed out that all I needed was the API my provider uses and the Posting URL. This was this point when I remembered that Blogspot and blogger are essentially the same thing, well it had been a while since I last used it!

From here I went back to word and inputted my account details and it successfully connected and retrieved the list of blogs under my account, I selected the right one and away I go. It does remain to be seen how the formatting works, but I won't know that until I have submitted it!


The other feature I have found that helps me review the blogs I like to visit is the built in RSS support in Outlook, whilst there is support for RSS feeds in IE7 it makes better sense to me to have Outlook tell me when a blog has new posts rather than looking in IE. Adding RSS feeds is as easy as right clicking on the RSS feeds folder and selecting add a new feed, enter the feed URL, then optionally select advanced settings to change the location of the feed content (i.e. a PST), whether you want to download enclosures to the feed and if you want to download the article as an html file.

You can also change the frequency with which Outlook automatically checks for new content by way of Send/receive groups.

Thursday, July 20, 2006

Vista - Controlling the Sidebar

The sidebar in Vista is Billed as being an efficient way to access lightweight apps (Gadgets) that perform a specific task well, in much the same way that Yahoo Widgets (formally Konfabulator), and Google gadgets work.  The problem with having these competing interfaces is interoperability between them, and the Vista Sidebar being supported solely on Vista.  Whilst the sidebar has been successfully ported to XP here, it remains to be seen whether Microsoft will offer it as a supported product in XP.

So in mixed OS environments, do you make use of this feature of Vista?  Well if the answer is yes, you can control how it behaves through GPO, and as the defaults leave it pretty user configurable this maybe a good idea.

The GPOs can be configured on a machine or user basis and the policy settings can be found in gpedit under either User or Machine Configuration branch – Administrative templates – Windows Components – Windows Sidebar.  There are only some fairly basic settings here, but essential for locking down the use of the sidebar:-

Turn off Windows Sidebar
Obviously does what it says on the tin, however if you don’t configure this the sidebar will be displayed by default.
Turn off unsigned Windows Sidebar gadgets     
This will stop the sidebar running any gadgets that haven’t been digitally signed.  Again this is switched off by default and will allow the running of any gadget regardless of whether or not it is signed.
Turn off user installed Windows Sidebar Gadgets.
This prevents the sidebar from running any gadgets that have been installed by the user.  Again if you don’t configure this it gives users free reign on what gadgets they install.
Override the more gadgets link
This enables you to redirect the ‘Get more gadgets online’ link to a website of your choice.  If you don’t configure this, the link goes to the default Microsoft site.


So if you want to lockdown how the sidebar is used by your users, it’s important you configure the GPOs accordingly.

Thursday, July 06, 2006

IE7 - Protected Mode

Well this is the kind of feature that could have been very useful for me a few years back when supporting a network of ‘normal’ users i.e. everything on the internet should be accessible, and all features of any site should work.  Not an unreasonable expectation of course, however code can be used in or by websites that can maliciously or unintentionally make undesirable changes to your system.

The new (not so new now) Internet Explorer 7 Plus (plus -  indicating it’s the Vista version, and therefore it has this feature) which is now in Beta 3 has a ‘Protected mode’ which controls what Areas of the Registry and User Profile Internet Explorer can write to.  This feature has been referred to as ‘Sandboxing’ internet explorer away from the operating system, which is effectively what it does by removing the integration with the operating system that has been pervasive in previous versions.

I should say at this point that the Protected mode is configurable for each security zone in the browser itself, or as an administrator you can set it by GPO so that users can’t change the setting.  With this in mind, by default Protected mode is disabled for sites in the Trusted Zone, but interestingly enough it is turned on by default in the Intranet Zone.

Low Integrity
In Vista, anything that can be secured, has an associated Integrity level, basically the level of privilege that is required by any process to get Write access to the object, alongside this each process has am integrity level defined.  As you might expect, processes with Low Integrity cannot gain access to any object that requires a higher integrity level.

Internet Explorer in protected mode uses the lowest of the three integrity levels, Low Integrity, giving it access to objects that require only low integrity, it’s worth noting that this is the case regardless of whether the user has access to the object as Integrity levels are checked prior to User Permission checks.

So rather usefully, IE7+ in protected mode does not have access to most of the Registry and is locked away from the sensitive areas both in the registry and the file system.  

Elevation
So what if you have a bunch of sites that are on your intranet that require write access to objects on the client machines?  Well you can turn off protected mode for intranet sites, this however maybe insecure due to the default behaviour of Internet Explorer is to auto-detect intranet sites and somebody may be running a web server surreptitiously on your network that may cause issues on systems where Internet Explorer does not operate in protected mode.  Another option is to add the relevant sites to the Trusted sites list, but letting users add sites to this list could become an issue.  The other method specifically used by IE7+ is to create a broker process to elevate so the process can access high integrity level objects, the behaviour of these brokers can be configured in the registry as to how IE accesses the object that is being brokered.  This process can be as simple as a Window popping up to say that a website is trying to open a file in Word and asking for user permission to open it.


Conclusion
Personally, I like this feature, and it seems a certain amount of control can be gained through the registry, and therefore through GPOs.  The flexibility of turning the feature on/off by zones will enable easy testing of websites as to whether it’s the Protected mode that is causing the issue without leaving the browser completely vulnerable.
Friday, June 16, 2006

Snipping tool

Just discovered a useful little tool in Vista, the snipping tool, and it kind of does what it says on the tin. When you launch it you get a cursor to highlight areas of the screen and the highlighted area is copied in much the same way as Print Screen shortcuts do, except it opens it in its own application and you get to choose the area you will save, not just active window or whole screen. You also have the option to snip a freeform shape too. When you have the area captured you can just save it as png, jpg, gif, or mht.


I know, its not something to get overly excited by, but it could come in useful on support calls for getting part screen shots from users.

Thursday, June 15, 2006

Internet Explorer 7 - Certificate Warning

If like me you have been playing around with Internet Explorer 7 there is an interesting and generally useful security feature where certificates are checked prior to loading the page and if there is a problem with the certificate it loads an intermediate page warning you of the problem that looks like this.

It does give you the option of carrying onto the page you are trying to get to such as this.  Notice the address bar is coloured red and it gives a clue why with the certificate error message to the right.  My situation was that I was using a different DNS name in the URL to make life easier for myself (lazy I know!), after a few days I got sick of doing this and tried to find a way around this issue.

Manual Solution

Well there is an entry in the advanced tab of Internet options in IE7 near the bottom of the list called ‘Warn about certificate address mismatch’, and by default this is checked.  If you uncheck it you can restart IE and go straight to the URL with no problems and no warnings on the Address bar giving you this.

Registry/GPO Solution

This can be useful for getting rid of the annoyance, but if you are willing to take this chance and you have Web Apps or Services that you have given ‘friendly’ names that aren’t on its certificate, and to stop users from worrying when they get this error then you can make an adm template to change the following registry key:-

[HKEY_CURRENT_USER\Software\Microsoft\Windows\
CurrentVersion\Internet Settings]
"WarnonBadCertRecving"=dword:00000000

The key is set to 1 by default, to turn the feature off set the key to 0.    

Wednesday, May 10, 2006

GPO Administrative Templates in Vista Part 3

So now we move on from the previous post and construct some of the policy syntax to the ADM template by extracting the information from the ADMX/ADML templates.

Simple Policy Syntax
In the ADMX template, at the end of the ‘Categories’ (signified by </category>) you will see the beginning of the Policies section.  Using the Device Installation ADMX/ADML files as a basis you will find the First policy is as shown here:-

<policy name="DeviceInstall_AllSigningEqual" class="Machine" displayName="$(string.DeviceInstall_AllSigningEqual)" explainText="$(string.DeviceInstall_AllSigningEqual_Help)" key="Software\Policies\Microsoft\Windows\DeviceInstall\
Settings" valueName="AllSigningEqual">
      <parentCategory ref="DeviceInstall_Category" />
      <supportedOn ref="windows:SUPPORTED_WindowsVista" />
      <enabledValue>
        <decimal value="1" />
      </enabledValue>
      <disabledValue>
        <decimal value="0" />
      </disabledValue>
    </policy>

So we can see that as mentioned on the previous post the policy class is stated on a per-policy basis.  The display name and the explain text sections work in much the same way as with the categories, they are linked to strings in the ADML template file shown here:-

<string id="DeviceInstall_AllSigningEqual">Treat drivers signed by Microsoft the same as those signed by others</string>
      <string id="DeviceInstall_AllSigningEqual_Help">When selecting which driver to install, do not distinguish between drivers that are signed by Microsoft and drivers that are signed by others.

If you enable this setting, drivers will be selected for installation based on other criteria (such as version number or when the driver was created) rather than whether the driver was signed by Microsoft or by another vendor. A signed driver will still be preferred over a driver that is not signed at all. However, drivers that are signed by Microsoft will not be preferred over other drivers.

If you disable or do not configure this setting, drivers that are signed by Microsoft will be selected for installation over drivers that are signed by other vendors.</string>

The ADMX snippet also shows that the registry keys and associated value along with what to set the registry key to if you enable or disable the policy.  In this case the value AllSigningEqual would be set to a DWORD with a decimal value of 1 when enabled.

Extracting this information out and constructing the section of the ADM template would give you this:-

POLICY !!DeviceInstall_AllSigningEqual
             KEYNAME "Software\Policies\Microsoft\Windows\DeviceInstall\
Settings"
          EXPLAIN !!DeviceInstall_AllSigningEqual_HELP
             VALUENAME "AllSigningEqual"
              VALUEON NUMERIC 1
              VALUEOFF NUMERIC 0

        END POLICY

And in the strings section:-

DeviceInstall_AllSigningEqual=" Treat drivers signed by Microsoft the same as those signed by others "
DeviceInstall_AllSigningEqual_HELP=" When selecting which driver to install, do not distinguish between drivers that are signed by Microsoft and drivers that are signed by others./n/nIf you enable this setting, drivers will be selected for installation based on other criteria (such as version number or when the driver was created) rather than whether the driver was signed by Microsoft or by another vendor. A signed driver will still be preferred over a driver that is not signed at all. However, drivers that are signed by Microsoft will not be preferred over other drivers./n/nIf you disable or do not configure this setting, drivers that are signed by Microsoft will be selected for installation over drivers that are signed by other vendors."

Listbox Syntax
This becomes a little more interesting when you encounter policies with multiple ‘Parts’ (to use ADM Syntax), these have now become ‘Elements’.  Whilst all the information is in the ADMX and ADML templates to construct them, it is a pain to get the information together, when you find the info however it is pretty intuitive to construct the policy syntax if you are used to constructing/amending adm templates.

Here is an example of a listbox from this ADMX/ADML template set:-

From the ADMX template:-

<policy name="DeviceInstall_Classes_Deny" class="Machine" displayName="$(string.DeviceInstall_Classes_Deny)" explainText="$(string.DeviceInstall_Classes_Deny_Help)" presentation="$(presentation.DeviceInstall_Classes_Deny)" key="Software\Policies\Microsoft\Windows\DeviceInstall\
Restrictions" valueName="DenyDeviceClasses">
      <parentCategory ref="DeviceInstall_Restrictions_Category" />
      <supportedOn ref="windows:SUPPORTED_WindowsVista" />
      <enabledValue>
        <decimal value="1" />
      </enabledValue>
      <disabledValue>
        <decimal value="0" />
      </disabledValue>
      <elements>
        <list id="DeviceInstall_Classes_Deny_List" key="Software\Policies\Microsoft\Windows\DeviceInstall\
Restrictions\DenyDeviceClasses" valuePrefix="" />
      </elements>
    </policy>

From the ADML:-
<string id="DeviceInstall_Classes_Deny">Prevent installation of drivers matching these device setup classes</string>
      <string id="DeviceInstall_Classes_Deny_Help">Specifies a list of Plug and Play device setup class GUIDs for devices that cannot be installed.

If you enable this setting, new devices cannot be installed and existing devices cannot be updated if they use drivers that belong to any of the listed device setup classes.

If you disable or do not configure this setting, new devices can be installed and existing devices can be updated as permitted by other policy settings for device installation.

NOTE: This policy setting takes precedence over any other policy settings that allow a device to be installed. If this policy setting prevents a device from being installed, the device cannot be installed or updated, even if it matches another policy setting that would allow installation of that device.</string>

Also from the ADML:-
<presentation id="DeviceInstall_Classes_Deny">
        <listBox refId="DeviceInstall_Classes_Deny_List">Prevent installation of devices using drivers for these device setup classes:</listBox>
        <text>To create a list of device classes, click Show, click Add,</text>
        <text>and specify a GUID that represents a device setup class</text>
        <text>(for example, {25DBCE51-6C8F-4A72-8A6D-B54C2B4FC835}).</text>
      </presentation>

The equivalent sections in an ADM would be constructed as follows:-

POLICY !!DeviceInstall_IDs_Deny
          KEYNAME "Software\Policies\Microsoft\Windows\DeviceInstall\
Restrictions"
          EXPLAIN !!DeviceInstall_IDs_Deny_HELP
          VALUENAME "DenyDeviceIDs"
          VALUEON NUMERIC 1
          VALUEOFF NUMERIC 0
          PART !!DeviceInstall_IDs_Deny_LIST LISTBOX
          KEYNAME "Software\Policies\Microsoft\Windows\DeviceInstall
\Restrictions\DenyDeviceIDs"
          VALUEPREFIX ""
          END PART
          PART !!DeviceInstall_IDs_Deny_TEXT1 TEXT
          END PART
          PART !!DeviceInstall_IDs_Deny_TEXT2 TEXT
          END PART
          PART !!DeviceInstall_IDs_Deny_TEXT3 TEXT
          END PART
               
          END POLICY

And in the strings section:-

DeviceInstall_Classes_Deny="Prevent installation of drivers matching these device setup classes"
DeviceInstall_Classes_Deny_HELP="Specifies a list of Plug and Play device setup class GUIDs for devices that cannot be installed.\n\nIf you enable this setting, new devices cannot be installed and existing devices cannot be updated if they use drivers that belong to any of the listed device setup classes.\n\nIf you disable or do not configure this setting, new devices can be installed and existing devices can be updated as permitted by other policy settings for device installation.\n\nNOTE: This policy setting takes precedence over any other policy settings that allow a device to be installed. If this policy setting prevents a device from being installed, the device cannot be installed or updated, even if it matches another policy setting that would allow installation of that device."


The second section taken from the ADML template is taken from the Presentation table towards the bottom of the template following the strings table.

The rest, I think is pretty intuitive and the other ADM syntaxes are equally straightforward to construct.

Tuesday, May 02, 2006

GPO Administrative Templates in Vista Part 2

So how do you go about writing ADM templates from the ADMX and ADML templates included with Vista?  Well it’s a long laborious process so unless you absolutely need to continue to support ADM templates, I would stick with the new ADMX/ADML templates.

CLASS
In ADM templates you set the CLASS for the policies that followed the CLASS statement to either CLASS USER or CLASS MACHINE.  This denoted which registry hive the policies that followed would be amending; Hkey_Current_User and Hkey_Local_Machine respectively.  I personally split my policies into User and Computer policies, and so a single GPO will only be set to provide settings for one or the other registry hive.  I find this generally works well, and so I have adm templates that are tailored to either user settings or machine settings, therefore I only set the CLASS once per ADM template.  In the ADMX templates however the CLASS is given once per Policy setting and so if you are converting AMDX/ADML into ADM templates you need to be careful that you see this.
Categories
If you open one of the default ADMX templates in a text editor the first things you will notice after the XML pre-amble is the list of Categories along with the display name for the Category, the explaintext and its parent category as shown here:-

<category name="DeviceInstall_Category" displayName="$(string.DeviceInstall_Category)" explainText="$(string.DeviceInstall_Help)">
      <parentCategory ref="windows:System" />
    </category>
    <category name="DriverInstall_Category" displayName="$(string.DriverInstall_Category)" explainText="$(string.DriverInstall_Help)">
      <parentCategory ref="windows:System" />
    </category>
    <category name="DeviceInstall_Restrictions_Category" displayName="$(string.DeviceInstall_Restrictions_Category)" explainText="$(string.DeviceInstall_Restrictions_Help)">
      <parentCategory ref="DeviceInstall_Category" />
    </category>

So we can see here that the Device Install and Driver Install Categories both sit under the Windows System Category and Device Install Restrictions Category sits under the Device Install Category.  In much the same way as in ADM templates, the DisplayName and explaintext are listed as strings, however you will find these strings listed in the equivalent ADML template file rather than in the main body of the ADMX file.  The relevant section in the ADML that covers Device Install Restrictions Category looks like this:-

<string id="DeviceInstall_Category">Device Installation</string>
<string id="DeviceInstall_Help">Policy settings that control the installation of devices.</string>

<string id="DeviceInstall_Restrictions_Category">Device Installation Restrictions</string>
      <string id="DeviceInstall_Restrictions_Help">Policy settings that describe which devices can or cannot be installed on the System</string>

Ok, from here we have enough to layout the barebones of the ADM template as follows:-

CLASS MACHINE

CATEGORY !!DeviceInstallation

EXPLAIN !!DeviceInstallation_CATEGORY_EXPLAIN

CATEGORY !!DeviceInstall_Restrictions_Category

EXPLAIN !!DeviceInstall_Restrictions_Category_EXPLAIN

[strings]

DeviceInstallation="Device Installation"
DeviceInstallation_CATEGORY_EXPLAIN="Policy settings controlling the installation of devices on the system."

DeviceInstall_Restrictions_Category="Device Installation Restrictions"
DeviceInstall_Restrictions_Category_EXPLAIN="Policy settings describing which devices may or may not be installed on the system."

Part 3 will continue on to discuss a number of policy settings and how you construct the Policy Syntax for the ADM template from the ADMX/ADML template files.

Friday, April 28, 2006

GPO Administrative Templates in Vista Part 1

Well as I mentioned in the previous post Administrative Templates for GPOs are all set to change in Vista and Longhorn Server.  Although Microsoft says that for a majority of the time you won’t notice the difference, there are differences, and you need to be aware of them.

The underlying Policy file for each GPO (Registry.pol) is found in the Sysvol of Domain controllers in a Windows 200x network and it delivers registry based settings to the User/Computer; this will remain.  The differences will come with how they are presented to Administrators.  The two sets of files to concern yourself with are the admx and adml files, this can be found on any Vista station under %systemroot%\PolicyDefinitions and %Systemroot%\PolicyDefinitions\[MUIculture] (i.e. en-us  This is the American English Language file location), both sets of files are XML based.
The ADMX files contain the structure of the view of the policies that will be presented in the GPEdit or GPMC consoles and as with ADM templates they contain:-
  • Categories

  • Policies

  • Registry Key Paths and Values

  • Elements (previously known as Parts)

  • Control Types
The ADML files contain all the language specific information such as Explain Text and Help Text; it also contains information such as Default values and Spin.  This split will help with International Companies that may have offices that speak different languages but wish to have IT staff in several locations working on the same GPOs; you can just create a separate set of ADML templates.  Your first reaction to this maybe that this would just bloat the size of Sysvol with all these additional templates, this is another major change coming with Vista/Longhorn, the ADMX/ADML templates will be stored in the Sysvol share as a single set of templates rather than one set per policy.

This is all good news so far, but what happens if you use other tools to manage GPOs that are also reliant on ADM templates for the Structure it display policies with.  Well this means you will just have to create your own ADM templates and include any Vista specific settings in them.  I will go through this in more detail in Part 2.

Windows Vista

I have had this post hanging around on my computer for a while waiting for me to have some time to finish and upload it but here goes.

I have spent the couple of months or so evaluating Vista with respect to:-

  • Features and how to centrally manage and them with Group Policy Objects (GPOs).

  • How to lockdown Vista for use in a secure environment

  • How to let trusted administrators turn on ‘useful’ or cool new features.

  • Ease the learning curve for the users of Vista.

Well the good news is that it in an environment that is closely managed and tightly locked down such as in Educational Institutions most of the new features will be locked down by existing GPOs that you have in place.  The company I work for is a large IT service provider and supplier to the Educational market in the UK and further a field.  My primary interest in Vista comes from a security standpoint; how can we lock the OS down so that Kids (or adult users) can’t break the OS but keeping it usable and exposing the new features they can make use of.

Whilst the level of locking down we do will not be required by many corporate networks it’s a good start point to lock the whole thing down and open things up as required or demanded (with justification) by the business.

In a Windows 200x/XP based network GPO settings are exposed in the Microsoft tools (GPMC, GPEdit) by the use of Administrative templates, currently these are ADM templates that use a kind of markup language that is proprietry to Microsoft.  They control what you see in the MS GPO tools, how its laid out, descriptions of the settings, options you have for changing the settings.  Whilst this works, with the coming of Vista and Longhorn Server these ADM templates will not be used by default and ADMX and ADML files are used and are based on open xml standards but essentially do the same job as ADM templates with a few differences in the mechanics of how they work.  These will be discussed in more detail in another post.

In environments that use GPOs to lock down the OS its fairly simple to ensure Vista functionality is locked down too, you might ask why do this with the OS being all the publicity by Microsoft highlighting new security features in Vista?  Whilst this may be the case, during any period of co-existence between different versions of Windows (XP and Vista) there will obviously be a learning curve, but you can stick to classic menus and the same GPOs to provide a common User Experience between the two versions.  Useful new features in Vista can be evaluated and introduced as users are educated in these features and begin to use them on a home computer.

In my next few posts I will be going through the Vista Feature set providing information on how to control access to and features of them, generally they will come as time allows or when I happen to be testing them.

Sunday, April 09, 2006

First One.....

Well, I thought it was about time I started one of these things.

I will no doubt post to here when I get chance, if I have something to say.........If I don't, obviously I won't.

Laters.